Crocheted Djembe Drum
My friend DB is a fabulous drummer, so for his birthday, I wanted to crochet him a djembe, a traditional African drum. (Not) surprisingly, I couldn’t find a pattern for one, so I made one up. Enjoy!
Crocheted Djembe
Supplies Needed: H (5.00 mm) hook, worsted weight yarn in off white, black, and 3 other shades (pick ones in the brown or red family for accuracy), plastic canvas, polyfill stuffing
Note: Firmly stuff as you go. Entire piece is worked by joining each round.
Body of drum:
In off-white, ch 2.
1. In 2nd ch, sc 6. Join with ss. Ch 1. Do not turn.
2. 2sc in each st around. Join with ss. Ch 1. Do not turn.
3. * 2sc in first st, sc, rep from * around. Join with ss. Ch 1. Do not turn.
4. * 2sc in first st, sc in next 2, rep from * around. Join with ss. Ch 1. Do not turn.
5. * 2sc in first st, sc in next 3, rep from * around. Join with ss. Ch 1. Do not turn.
6. * 2sc in first st, sc in next 4, rep from * around. Join with ss. Ch 1. Do not turn.
7. * 2sc in first st, sc in next 5, rep from * around. Join with ss. Fasten off.
Cut a circle out of the plastic canvas that fits the circumference of the off white piece and place it underneath the off white section. Continue crocheting with the piece in place.
8. Join with black. Sc even around. Join with ss. Fasten off.
9. In back loops only, join with body color 1 (brown). Sc even around. Join with ss. Ch 1. Do not turn.
10. In both loops, sc around. Join with ss. Ch 1. Do not turn.
11. Rep R 10.
12. * Sc2tog, sc in next 4. Rep from * around. Join with ss. Ch 1. Do not turn.
13-14. Rep R 10. After R14, fasten off brown.
15. Join body color 2 (red). Sc around. Join with ss. Ch 1. Do not turn.
16. * Sc2tog, sc in next 3. Rep from * around. Join with ss. Ch 1. Do not turn.
17-20. Rep R 10. After R20, fasten off red. If desired, in R20, evenly space long single crochet stitches around (instructions here) Do one every 3-4 stitches, to your taste.
21. Join body color 3 (tan). Sc around. Join with ss. Ch 1. Do not turn.
22. * Sc2tog, sc in next 2. Rep from * around. Join with ss. Ch 1. Do not turn.
23-24. Rep R 10.
25. * Sc2tog, sc in next. Rep from * around. Join with ss. Ch 1. Do not turn.
26. In back loops only, *2sc, sc in next. Rep from * around. Join with ss. Ch 1. Do not turn.
Cut a circle out of the plastic canvas that fits the circumference of the piece after row 25 and place it inside the section. Continue crocheting with the piece in place.
27-28. Rep R 10. After R28, fasten off tan. Again, here you can put the long single crochet stitches evenly spaced.
29. Join red. *2sc, sc in next 2. Rep from * around. Join with ss. Ch 1. Do not turn
30-31. Rep R10. After R31, fasten off red. Again, here you can put the long single crochet stitches evenly spaced.
32. Join brown. *2sc, sc in next 3. Rep from * around. Join with ss. Ch 1. Do not turn
33-35 (Or desired length – do as many row here as you want). Rep R10.
Cut a circle out of the plastic canvas that fits the circumference of the base of the piece and place it inside. Continue crocheting with the piece in place.
36. In back loops only, * Sc2tog, sc in next 3. Rep from * around. Join with ss. Ch 1. Do not turn.
37. In both loops, * Sc2tog, sc in next 2. Rep from * around. Join with ss. Ch 1. Do not turn.
38. * Sc2tog, sc in next 1. Rep from * around. Join with ss. Ch 1. Do not turn.
39. Sc2tog in each st around. Draw yarn through all six stitches and draw up tight. Fasten off.
Drum Tightening loops:
Join with black in the front loop of any stitch on row 8. Draw up a loop through the front loop of the stitch directly below in row 26. SS in same stitch and in next 3 stitches in row 8. * Draw up a loop through the front loop of the next stitch in row 26. SS in same stitch and in next 3 stitches in row 8. Rep from * around. When you get back to where you added the black, make a chain of about 25-30 chains and ss to the first front loop on row 26. Ch 5 and fasten off.
Finished Drum with Playable Version:
Terms used:
Ch – Chain
Sc – Single Crochet
SS – Slip Stitch
Please note: This pattern is free for your use. Please feel free to make as many as you want of the finished project. If you choose to sell your final product, please credit this site for the pattern. Please DO NOT SELL the pattern. Thanks!
More Superhero Charts
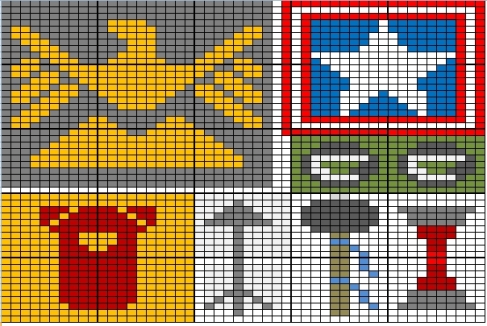
In honor of the release of the Avengers, I have charted several more logos. These are all 50 x 50 charts.
The Avengers
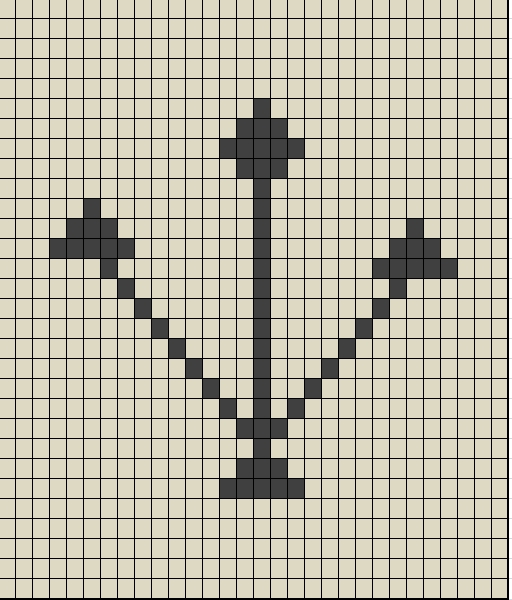
The Black Widow
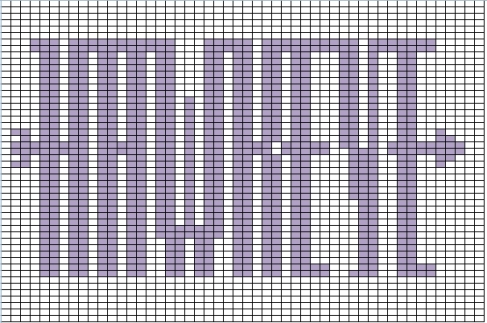
Hawkeye
Avengers Assemble!
Please note: This pattern is free for your use. Please feel free to make as many as you want of the finished project. If you choose to sell your final product, please credit this site for the pattern. Please DO NOT SELL the pattern. Thanks! Also, I have nothing to do with Marvel. These are just my homage to them.
Lace Up Tunisian Fingerless Gloves
4 oz Bulky Weight Yarn (I used Bernat Bamboo Natural in Linen), H afghan hook, 2 yards ribbon
Note: This pattern presupposes you already know how to do the Tunisian purl and Tunisian knit stitches.
Make two the same (unless it indicates otherwise)
For Both:
Ch 24
3 rows Tunisian Purl
For left glove:
PU 15 as knit, work 4 rows Tunisian knit, fasten off.
Sk 2 stitches, PU 7 as knit, work 4 rows Tunisian knit.
For right glove:
Left Thumb:
PU 7 as knit, work 4 rows Tunisian knit, fasten off.
Sk 2 stitches, PU 15 as knit, work 4 rows Tunisian knit.
For Both:
Work 19 rows Tunisian knit.
Work 3 rows Tunisian purl.
Fasten off.
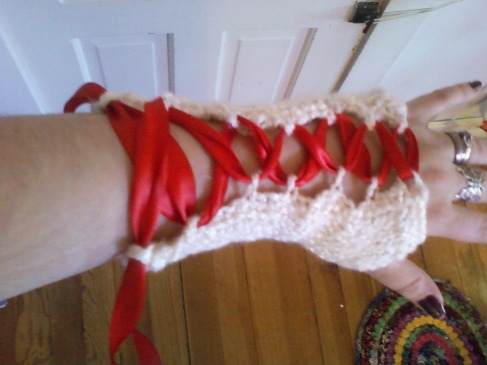
Use ribbon to lace up the two sides of each glove.
Please note: This pattern is free for your use. Please feel free to make as many as you want of the finished project. If you choose to sell your final product, please credit this site for the pattern. Please DO NOT SELL the pattern. Thanks!
- March 27, 2012
- Patterns
- Comments closed
Alchemy Afghan
All charts are 30 x 30. Colors are suggestions.
Winter
Spring
Summer
Autumn
Day
Night
Hour
Year
Fire
Air
Water
Earth
Gold
Silver
This is the layout I intend to use:
Please note: This pattern is free for your use. Please feel free to make as many as you want of the finished project. If you choose to sell your final product, please credit this site for the pattern. Please DO NOT SELL the pattern. Thanks!
Superhero Logo Charts
All panels are 50 x 50.
~Batman
~The Green Lantern
~Watchmen
~Superman
~Spiderman
~Dead Pool
~Captain America
~Wonder Woman
~The Flash
~Iron Man
~Thor
~Marvel Comics
~DC Logo
~The X-Men
~The Fantastic Four
~The Incredible Hulk
Please note: This pattern is free for your use. Please feel free to make as many as you want of the finished project. If you choose to sell your final product, please credit this site for the pattern. Please DO NOT SELL the pattern. Thanks! Note: I have no affiliation with Marvel or DC.
More New Broadway Panels
Big River
Working
West Side Story
Children of a Lesser God
Peter Pan
Snoopy the Musical
Godspell
Chess
Finian’s Rainbow
Please note: This pattern is free for your use. Please feel free to make as many as you want of the finished project. If you choose to sell your final product, please credit this site for the pattern. Please DO NOT SELL the pattern. Thanks! Note: I have no affiliation with any of these shows.
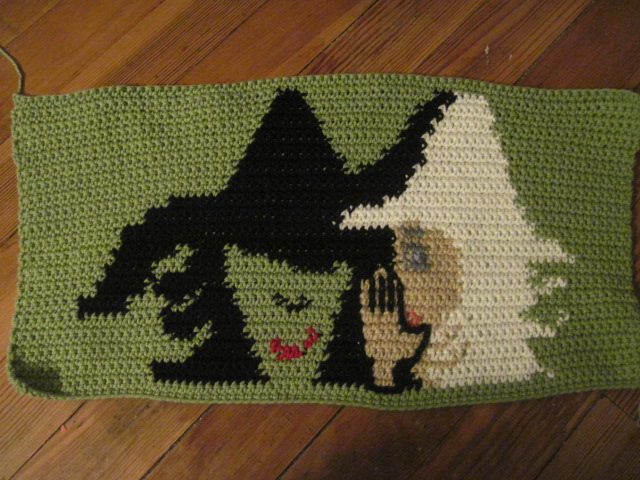
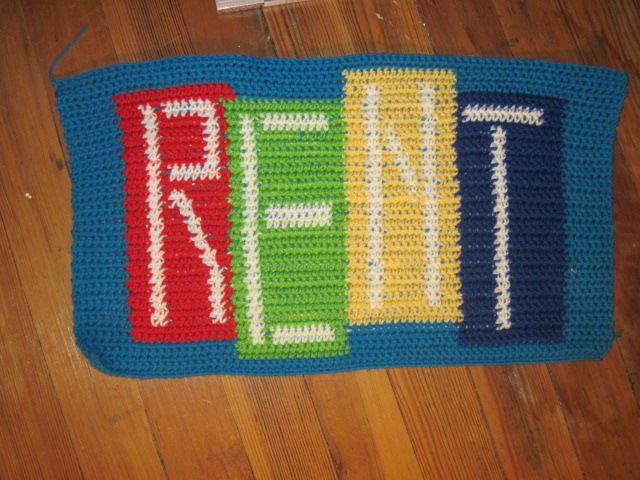
New and Revamped Broadway Panels
All of these panels are 40 x 75.
The Little Mermaid
The Secret Garden
Wicked (redone) – (Note: when I was done with this one, I top stitched the hand details onto Glinda; see second picture)
RENT (redone)
The Boy From Oz
Aida (redone)
Jekyll & Hyde
Please note: This pattern is free for your use. Please feel free to make as many as you want of the finished project. If you choose to sell your final product, please credit this site for the pattern. Please DO NOT SELL the pattern. Thanks! Note: I have no affiliation with any of these shows.
Rubik’s Cube
F Hook, Worsted
Make 9 of each color:
Blue, Red, Orange, Yellow, Green, White
Ch 4, join with a sl st to make a ring
Rnd1: 1ch (don’t counts as a st), 12sc in ring. Place a marker to indicate end of round and move marker up as work progresses.
Rnd2: *3sc in first sc, sc in next 2sc*; repeat *to* three more times
Rnd3: sc in next sc *3sc in next sc, sc in next 4sc*; repeat *to* two more times, 3sc in next sc, sc in next 3sc
Join with Black
Orange across from white
Yellow across from Red
Green across from blue
At end: Assemble into a cube and stuff when almost finished assembling.
Arrange as follows:
| Blue | Blue | Blue | Orange | Orange | Orange | |
| Blue | Blue | White | Yellow | Orange | Orange | |
| Blue | Blue | Blue | Orange | Orange | Orange |
| Yellow | Yellow | Yellow | Red | Red | Blue | |
| Yellow | Yellow | Yellow | Red | Red | Red | |
| Green | Yellow | Yellow | Red | Red | Red |
| Green | Orange | Green | White | White | White | |
| Green | Green | Green | White | Red | White | |
| Green | Green | Green | White | White | White |
Please note: This pattern is free for your use. Please feel free to make as many as you want of the finished project. If you choose to sell your final product, please credit this site for the pattern. Please DO NOT SELL the pattern. Thanks!
Baby Satyr Hat
This pattern makes a hat that fits a 17-19″ head.
H hook, bulky weight yarn for the hat, worsted weight for the horns.
Hat:
Ch 4, join with sl st to form ring.
- ch 1, 9 sc in ring; join with sl st in first sc (9 sc)
- ch 3 (counts as dc from here forward), dc in joining space, (2dc in each sc) join with sl st (20 dc)
- ch 3, dc in joining space, dc in next dc, (2dc in next dc, dc in next dc) join with sl st (30 dc)
- ch 3, dc in joining space, dc in next two dc, (2dc in next dc, dc in next two dc) join with sl st (40 dc)
- ch 3, dc in next 7 dc, (2dc, dc in next 7 st) (44 dc)
- ch 3, (dc in each dc) (44)
- Rep R 6 (44)
- Rep R 6 (44)
- Rep R 6 (44)
- Rep R 6 (44)
- Rep R 6 (44)
- Rep R 6 (44)
- Rep R 6 (44)
Fasten off.
Horns (Make 2):
- Sc 3 in magic circle, sl st to join, pull tight. (3)
- 2 sc in each st around, sl st to join. (6)
- Rep R 2. (12)
- Sc around. (12)
- Rep R 4. (12)
- Sc, sl in next 4 st, sc in next 2 st, dc in next 4 st, sc. (12)
- Rep R 6. (12)
- Rep R 6. (12)
- Rep R 4. (12)
- Rep R 4. (12)
- Rep R 4. (12)
Fasten off. Stuff and sew to hat.
Weave in all ends.
Please note: This pattern is free for your use. Please feel free to make as many as you want of the finished project. If you choose to sell your final product, please credit this site for the pattern. Please DO NOT SELL the pattern. Thanks!
- October 16, 2011
- Patterns
- Comments closed
June 2024 M T W T F S S 1 2 3 4 5 6 7 8 9 10 11 12 13 14 15 16 17 18 19 20 21 22 23 24 25 26 27 28 29 30 Vintage
- October 2021 (1)
- April 2021 (1)
- April 2017 (2)
- August 2016 (1)
- July 2016 (1)
- May 2016 (2)
- April 2016 (5)
- February 2016 (5)
- January 2016 (16)
- December 2015 (1)
- June 2015 (1)
- May 2015 (2)
- April 2015 (4)
- March 2015 (2)
- September 2014 (3)
- August 2014 (4)
- June 2014 (2)
- May 2014 (1)
- February 2014 (2)
- November 2013 (1)
- October 2013 (1)
- August 2013 (2)
- July 2013 (2)
- March 2013 (1)
- February 2013 (1)
- January 2013 (3)
- November 2012 (1)
- October 2012 (3)
- September 2012 (5)
- July 2012 (4)
- May 2012 (1)
- April 2012 (1)
- March 2012 (1)
- January 2012 (1)
- December 2011 (1)
- November 2011 (3)
- October 2011 (2)
- August 2011 (1)
- July 2011 (2)
- June 2011 (4)
- May 2011 (1)
- April 2011 (1)
- February 2011 (1)
- January 2011 (2)
- December 2010 (8)
- November 2010 (3)
- October 2010 (3)
- September 2010 (1)
- August 2010 (2)
- June 2010 (7)
- April 2010 (14)
- March 2010 (4)
- February 2010 (2)
- January 2010 (2)
- December 2009 (5)
- November 2009 (1)
- September 2009 (1)
- August 2009 (3)
- July 2009 (10)
- June 2009 (5)
- May 2009 (3)
- April 2009 (2)
- March 2009 (7)
Happy Hookers
- 1,451,571 hits
Happy Hooker\’s RSS Feed
Meta
Categories
- Broadway (8)
- Charts (96)
- Crochet Journal (16)
- Cross Stitchery (4)
- Embroidery Pattern (1)
- Helpful Stuff (5)
- Patterns (88)
- Stitches (1)
- Uncategorized (36)
- Yarn (1)









You must be logged in to post a comment.